 Asset settings

This panel is used to list and manage all the assets of the project. There is no production tracking from this panel, as it is used only to edit asset settings.
List

The list on the left lists all the assets of the project, and you can use the Search field to filter them by name or ID. The top selector filters the assets according to their containing group.
When changing the size of the rows in the list, more details about each asset can be displayed. The folder button on the top right corner for each asset in the list opens the asset folder in your file explorer.
Use the button to create a new asset in the current group. The
button removes the selected asset from the project1.
You can use the [Shift + A] shortcut key to quickly add new assets.
You can use the [DEL] or [Shift + X] shortcut key to quickly remove selected assets.
You can scroll all lists using [Middle click] as well as the [Mouse wheel].
Edition

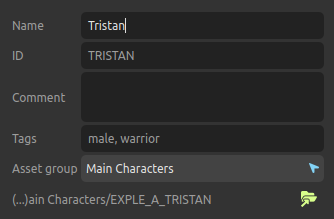
- Name is the asset’s display name.
- ID is the unique identifier which is used in the files and folders (see the Ramses Tree section). It can’t be changed after the asset folder has been created. Read the Ramses naming conventions to learn how IDs and names have to be formatted.
- Comment can be any text associated to the asset and describing it.
- Tags can be used later to search for specific assets. It is a comma separated list of any text.
- You can change the Asset group which contains this asset.
- The
button opens the asset folder in your file explorer. This folder contains the individual working files, each in its step subfolder. For more details, read the Ramses Tree section.
Hint
In the current version of Ramses, when changing the asset group, the asset folder won’t be automatically moved. This may change in a future version.
-
The data is not actually deleted from the server nor the local data, but just flagged as removed. A server administrator can still restore the data at any time, but there is no way (yet) to do that from the user interface of the application. ↩