Importing assets
Format settings
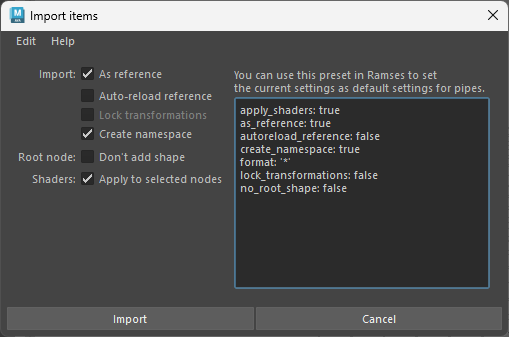
The text on the right can be copied to any pipe type in the Ramses Client Application. When importing an asset, Ramses will first look for these settings, and if they’re found, it won’t show the settings dialog unless the user checked the box Edit import options when importing the asset.
- Files can be imported as references.
- When files are imported as reference, you can force a reload of the reference after it’s been imported with the Auto-reload reference option. This will fix some import issues encountered in complex files in rare cases, where some connexions may break when programmatically referencing a maya file. But it makes the import process a bit longer (the time it takes to reload the reference).
- All transformations of all nodes can be locked.
- By default, a namespace is created to store the imported objects. This can be deactivated. Use with caution as name conflicts can generate errors on import/update!
- Imported objects are grouped in a transform node. By default, a shape (a square around the objects as a nurbsCurve) is created to easily manipulate them in the viewport. Note that in some rare cases, some connexions between the imported nodes may break if this shape is added to this group node. This seems to be a bug in Maya, and in this case preventing the addition of this shape by checking this option is an easy workaround.
- When importing a shader library, shaders can automatically be applied on the selected nodes. Ramses will use the node names to apply the shaders: the selected nodes must have the exact same name as the nodes in the scene used to publish the shaders.
Shaders
When importing a shader library, as published with the publish method of the Add-On, Ramses will automatically assign these shaders to any mesh imported along with the shaders; this is a quick way to import both Alembic meshes and their shaders for example: just import both files at once.
If you just want to assign the shaders to existing geometry, just select on or several nodes containing the meshes, and Ramses will try to assign the imported shaders to them, using the names of the transform nodes containing the meshes. If the shaders are not correctly assigned, check the names of the nodes. Namespaces are ignored when matching nodes with their shader.
If you need to replace or reassign shaders already imported, the quick and easy way is to remove them from the scene, select the meshes, and import them again. All the shaders will be automatically re-assigned.
All Settings
These are all the available settings:
format: '*' # The file format these settings apply to. Either a wildcard '*' or the file extension (without the leading ".")
apply_shaders: true
as_reference: false
autoreload_reference: False
lock_transformations: true
create_namespace: true
no_root_shape: false
These settings can be set directly in the Ramses Application’s pipeline editor, or directly using the pipe editor, in the settings field.