 Asset and shot production tracking
![]()
There are two panels to track the production of the shots and of the assets. From these tables, you can manage the status of all the assets and all the shots of the project, check their completion ratio, how much time was spent for each of them, check the estimation, and finally how late (or not) you are…
▹ More details about production tracking.
Overview
The production tables have three main areas: the toolbar on top contains a few useful menus and tools, the main table is where shots or assets are listed, and the dock shows the editors (on the right side of the main table by default).
Toolbar

On its left side, the toolbar displays a few menus and tools.
 The first button is a selector to let you filter the displayed asset by asset group, or the shots by sequence.
- Use the Search field to filter the shots or assets according to their names or IDS.
 View
View- Show details: when checked, the default height of the cells is adjusted to show all details and information.
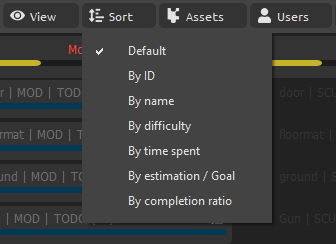
 Sort
Sort
Use the sort menu to sort the rows either by: ID, name, difficulty, time spent, estimation or completion ratio.
 Steps
Steps- Select all shows all the steps in the table.
- Select none hides all the steps from the table.
- Select my steps shows only the steps where the current user has some tasks assigned.
- Use the list of steps to select the ones you want to be shown in the main table.
 Status
- Assign User assigns a user to all selected tasks.
- Change state changes the state of all selected tasks.
- Changer difficulty changes the difficulty of all selected tasks.
- Set completion changes the completion ratio of all selected tasks.
If the current user is at least a project adminstrator, the toolbar also displays an entry to let you quickly create new items (shots or assets) or remove selected items.
Hint
To sort rows, click on the sort button on the top left part of the column you want to use for sorting.

Tip
The Status menu is also availabe as a context menu with the [right click].
Main table
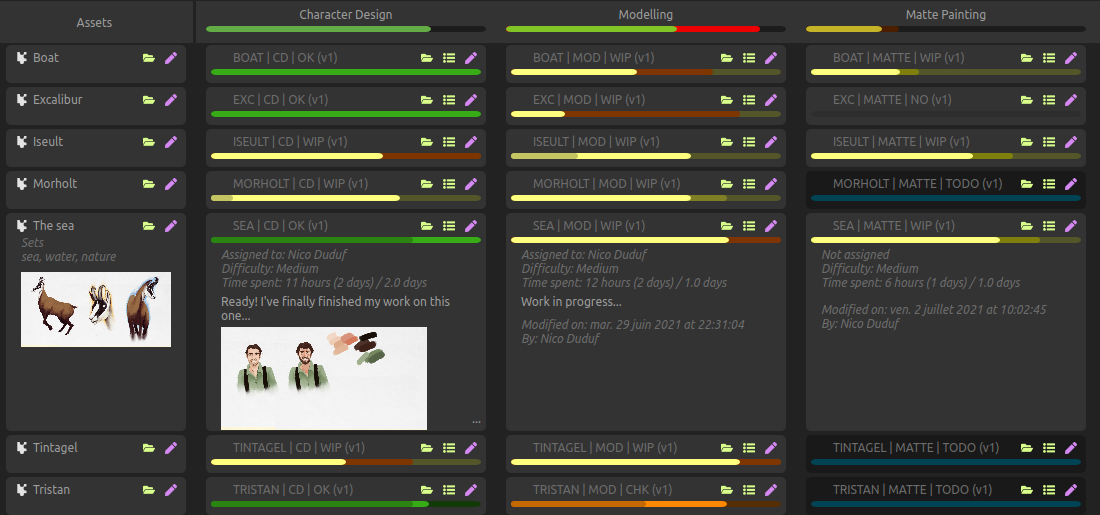
From the main table, you can have a look at all the status of all shots or assets, and a summary for steps on the column headers.
You can use the [Middle Click] to quickly scroll/pan in the table.
The progress bar in the step headers goes from red to green when the completion ratio raises.
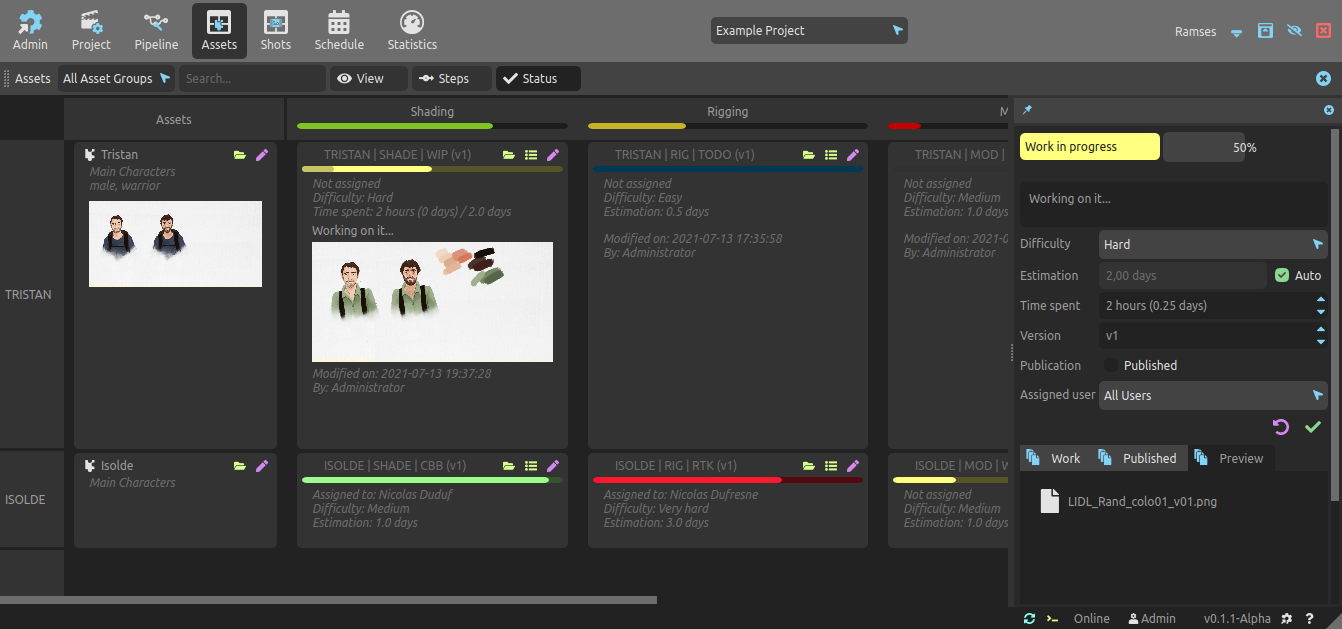
The first column contains all the information about the shots or the assets (duration, tags, etc.).
For all cells, you can open the corresponding folder with the ![]() folder button, and if you have enough rights you can click the corresponding cell to edit the details on the side panel.
folder button, and if you have enough rights you can click the corresponding cell to edit the details on the side panel.
When changing the size of the rows, more details can be shown for each task, including a preview image.
The image is pulled from the _preview subfolder of the shot or the asset folder which you can open with the ![]() folder button on the top right corner of the cell. Ramses will get the first PNG or JPG correctly named image from the folder, or any other image if a correct one is not found.
folder button on the top right corner of the cell. Ramses will get the first PNG or JPG correctly named image from the folder, or any other image if a correct one is not found.
Each cell contains information about a task (the combination of an asset or shot and a step).
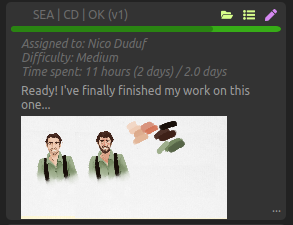
The title of the cell shows the ID of the asset or shot, of the step, and of the current state. The current version of the working file is shown in parenthesis.
The ![]() button shows the status history of the task.
button shows the status history of the task.
The progress bar can show multiple information.
- Its color corresponds to the current state color.
- It shows the completion ratio.
Click on any cell to edit its details in a side panel:
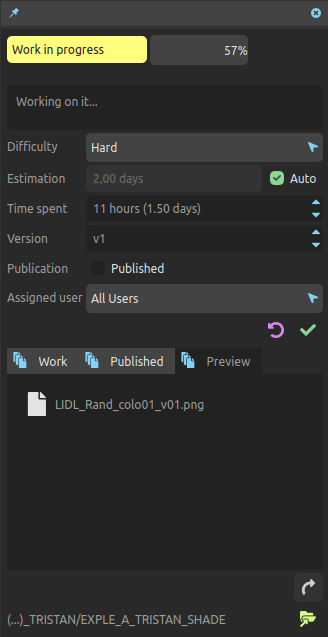
- Use the colored state box on the top left to change the current state.
- Use the completion slider on the top right to change completion ratio. Just click the slider without dragging to precisely edit the value.
- You can add a comment just below the completion ratio.
- Changing the difficulty will change the automatic estimation, according to the settings of the corresponding step.
- Uncheck the Auto checkbox to manually estimate the time you need to finish the task. Once unchecked, the estimation will not be automatically changed anymore if you change the difficulty or if the step settings change.
- The time spent is automatically updated by Ramses when you edit the status, according to the information it gets from the Ramses Add-ons and the data it gathers from the files if they’re correctly named and located. You can manually override this value.
- The current version should be automatically set by Ramses if you’re using the Ramses Add-ons; otherwise you can set it manually.
- If the task is published and ready to be used and imported in the next step, check the Published box. Again, Ramses should check it automatically if you’ve published the task using the Ramses Add-ons.
- The bottom box is used to Assign a user to the task. Leave it to All Users to unassign the task.
All these settings can be set precisely by the Ramses Add-ons thanks to pipeline automations, and the resulting data can be used for production tracking and planning
▹ More details about the pipeline.
▹ More details about production tracking.
▹ More details about planning.
The bottom part of the status editor shows the available working, published and preview files.
From these three lists, you can open any file by just double-clicking it. You can restore previous versions of working and published files, and the ![]() create from template button in the Work tab can create a new file from a step template (if any template has been published).
create from template button in the Work tab can create a new file from a step template (if any template has been published).
Files must respect the Ramses naming scheme and folders to be detected and listed here, but you don’t necessarily have to use the Ramses Add-ons, all files will be detected and handled by Ramses.
 Statistics
The Statistics button on the title bar of the application opens a summary of the progress of all steps and the whole project.
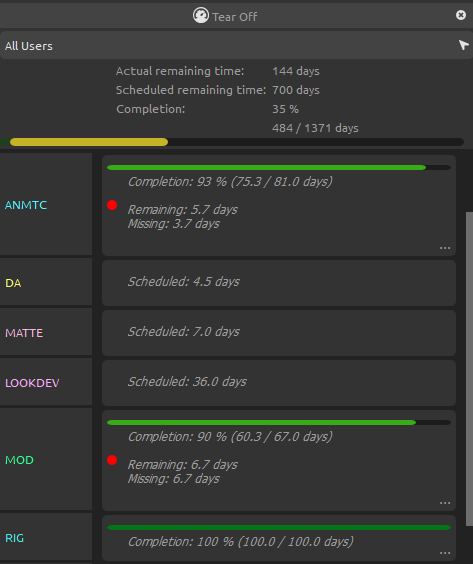
The top part shows the statistics for the whole project.
- Remaining time is the count of actual days before reaching the deadline of the project.
- Completion is the global completion of the project, both as a percentage, and a number of work-days completed (compared to the total estimated work-day count).
- Estimated Lateness is an estimation of the lateness for all steps; 0% means all is well, a negative lateness means there’s some advance (no, this never happens), a positive value means the production is late. 100% means it took twice the time originally estimated to get to the current completion ratio!
For each step, Ramses also compares the remaining work to the schedule, to warn you if you need to plan more days to complete the given step (or if there are extra days).
If you pull the row to make it bigger, you can get more details.
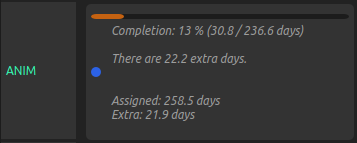
- Assigned shows how many days are assigned in the schedule for the given step, including past and future dates.
- Extra / Missing shows how many more days are needed to be assigned to the given step, or how many extra days are assigned, compared to the estimation. To the contrary of the extra or missing days shown above, this value does not take into account how much actual work was already done.
 Timelime
The Timeline button on the title bar of the application opens a timeline panel showing all the shots of the project.

From this timeline, you can reorder shots, open their folder, or edit their details by just clicking on the corresponding cell. The width of each row depends on the duration of the corresponding shot.
You can Use [Middle Click] to quickly scroll in the timeline, and you can use the slider on the left to zoom in and out. You can also control the zoom with [Ctrl] + [Middle Click] or with the [Mouse Wheel].
When selecting a shot on the timeline, it is also selected in the shot table, and vice versa.